Tuesday, 1 October 2019

The Planned 09 Layout

The baseboard under construction.

A start had been made on the baseboard for the 09 layout a few weeks ago.  Above is how it looks at the moment, there are two boards each 43" x 20" (109cm x 51cm) mainly made in 6mm ply wood.  The track bed will sit on the raised supports, the area at the centre front will be a dropped rock face.  It is hoped that on the left hand board will be the passenger station, goods siding and low-relief village back scene, the right-hand board will mainly be a track along a rock ledge running over a bridge over a small waterfall, with a siding to a small engine shed at the left-hand end.  There will be a back-scene board about 4.5" from the back with two storage loops, one on each board.

Photo of full scale initial plan.  In the end I decided to change the position of the engine shed siding. The name of the railway is going to be "The Penny Howe Light Railway".

The purpose for building the line in the first place has yet to be further researched and decided upon! - as has the village name, and the names of the locomotives.

Coach Number 2 has now been built and painted now to pair -up with the first one:-
The new coach is in the centre, made exactly the same way as the first using a Hornby GW 4-wheeler as a basis, with Peco bogies.


Friday, 30 August 2019

Some new 09 Stock

A second steam loco by Shapeways, Tebee Models.

I bought a second steam loco to go with the tank loco I already bought, this time a saddle tank, again mounted on a Kato 4w tram chassis.  The first loco now has a driver, a Noch example who was in a (I thought) ridiculous pose, so I cut-off his right arm and re-modelled a new one sculpted with Milliput.  The diesel loco also has a driver too, a bargain purchase of unknown make.  He had his head broken-off when purchased, in fact I had trouble finding it, but he needed facing to the left, so I filed his neck to fit, re-glued, and re-painted him 

A driver for the side tank loco.

New driver in the diesel too.

I had in mind that I could build an 09 coach from a Hornby GW 4-wheeler so I bought two second hand ones in a local shop.  It was stripped down to the body less it's window apertures and raised beading, the roof less it's window glazing and the chassis frame less brake gear and wheels as under:-


The door grooves were filled, then new window frames were made with Evergreen 1.5mm square rod and strip.

New window frames and beading added to the coach sides.

A chassis was made using some Wills sheet and some Peco GR-106 bogies, with the bogies sitting on thin nylon washers to aid free rotation.

After fitting some plasticard seats and glazing I now have a completed "prototype" coach for the new line:-
The coach seats at least eight "0" scale figures and I have obtained some from China for this purpose, they need a little effort to get them ready.  The coach is just about the right height for the railway, I am assuming the the floors are in a "well" to keep the centre of gravity low and good stability on the line.   

Thursday, 25 July 2019

09 Beginnings - couplings - wagons - steam loco.

Two Unit Models Open Wagons placed on a 7.5" radius curve to check clearances.

As a new scale/gauge is being contemplated, a number of experiments have to be carried-out.  Ensuring couplings will fit the stock is one of them.  How will they best operate?, and when fitted, will the length of the couplings allow clearance between ends of the stock on sharp curves?

I chose to stick with the Peco GR-101 009 couplings as they are right for me.  Though I had to check how they would fit the first stock I have built, which are a pair of open wagons.  They fit the N scale NR-121 wagon chassis OK, but when the frames of the wagons are placed over the top it only just allows for the coupling loop to lift as the frames are 2mm thick.  There is an advantage that the wagons will couple closer, but the above picture shows that on a 7.5" radius curve the corners of the wagon nearly touch.  It is best to check these sort of things as one can easily lay track and find later that the stock binds.

  I found the the Peco 009 couplings reacted nicely to an ordinary 13mm round craft magnet if laid underneath the track.


Preparing the chassis:-
The Peco NR-121 10ft wagon chassis as intended for N scale.

The buffers and brake gear were cut-off the Peco wagon chassis leaving the axle boxes, then the 009 couplings were slotted into the coupling pockets as seen below.

Spoked nylon wheels are supplied with these particular chassis.  In my experience the spoked wheels are a better gauge than the disc type supplied with other types of Peco N gauge wagon chassis and they certainly traverse turnouts better.  They are also very free-running.

The Shapeways/Teebee 09 side tank loco is just about finished.  A couple of hours were spent carefully sanding the plastic as flat as I could get it without putting the body under too much strain.  It was primed with Humbrol 01 Grey Primer, then the most visible parts of the loco were flatted off again. It was finished with Revell Dark Blue satin number 350, also using a mixed Humbrol grey/ satin black for the skirts, smoke box and chimney.  A whistle was crafted from 1mm and .45mm brass wire and then medium length handrail knobs were added along with hand rail wire.
The steam loco with two of the Unit Models wagons.

The Unit Models diesel and two open wagons.  No weathering has been applied just yet.

Tuesday, 9 July 2019

What? Another scale?

First "09" model: A Unit Models O-081 Diesel Loco Body built on a Kato 103 Tram Chassis.

With my "Shortwaite Hill" 009 project coming to some sort of completion, I was attracted (not for the first time) by "09" scale, (7mm scale running on 15" ((minimum gauge)) or 18"gauge track).  Re-reading Christopher Payne's and Bill Flude's recent articles in the Railway Modeller magazine, and also seeing one of our Group members new scratch built models only reinforced my curiosity, and again, ideas of a layout sprang into my mind.

I can use the same 009 or "N" gauge mechanisms that I am already familiar with, models would be slightly chunkier, and easier to see and handle.  009 track could be used (though really slightly small in scale) but I could disguise the sleepers in weeds and dirt as I usually do.  

The plan at first is to keep things simple.  I opted to send for some Unit models resin kits, available from Frizinghall Models & Railways.  They had been very helpful last year when I bought some Unit Models wagons via another retail outlet.  When the kits arrived, I found one of the chassis frames was missing.  On contacting Frizinghall, they manufactured a replacement resin frame and sent it to me very kindly free-of-charge.  I had enjoyed building resin kits when I made the Smallbrook Gn15 models.

Some of the Unit Models 09 wagons purchased.

I also sent for a Teebee 3D printed 09 loco body from Shapeways.  My previous experience with 3D printed railway models has not been great, and I knew that the finish of the plastic would be rather rough, but I would persevere this somehow.  I also had an idea in mind for a couple of passenger coaches.

Teebee Models 09 Side Tank body with half cab.

Never having modelled "0" scale before, I found out that the British, European and US 0 scales are all slightly different and soon noticed the difference in size of the figures that were available on the local model shops shelves.

So, to build a loco and weigh it all up.

I built the Unit Models Diesel and finished it in dark blue:

An easy kit to make.  Now I have to find a driver for it somehow.

Monday, 8 July 2019

A PW Train

The complete PW train from above hauled by the diesel tractor.

A permanent way train has been added to the SHLR stock.  It consists of a Meridian Stone wagon, a wagon built from an old bogie tool wagon (now on an Egger Tender chassis),  an H0e Roco Gondola bogie wagon and a modified Dundas Freelance 3rd coach, along with Coopercraft tools, ballast and sleepers etc.

 The PW train on the upper level hauled by Bagnall "Hazel".

The chance to buy a PECO "Charles" kit at a good price resulted in this tram loco.  I had never built a Charles kit before, but it went together OK while the footplate was adapted to take a Kato 103 4-wheeled tram chassis.  I have added hand rails and a brass whistle too.  It is still to be named, and also needs a driver.

The new tram loco also seen with a new Dundas DM03A Guards Van and the PW crew coach.

Wednesday, 12 June 2019

Diesel Tractor

The diesel tractor at Shortwaite engine shed.

One of our N&SNGM Group members was selling some of his 009 stock, and amongst them was this cobbled-together diesel.  I had seen it on his layout a couple of years ago and for some reason I really liked it.  Part of the body is the cab from a Roco 6-wheeled diesel and it runs on a shortened Kato 103 tram chassis.  I added some weight to the loco, and improved the rear lower cab sheet and added buffer beams.  After a repair to the chassis it ran well, so it was painted in the SHLR livery but retains it's original number "8" plates.  A driver was also added after these photos were taken and I am making a PW train for it to haul.

The diesel tractor in the Shortwaite goods siding.

Tuesday, 21 May 2019

The first public display for Shortwaite Hill and new stock.


The layout is set-up a few days before the event complete with the title board/lighting support.


I used some 4000k natural white LED light strip for the lighting.  Two strips each 1.1metres long were fixed to the rear of the title board.  It gives an ideal brightness, not shown very well in the above picture though, which was photographed in a conservatory with bright sunlight outside.

Photo taken at Great Eastern Models, Norwich 11th May 2019 with a little helper.

The layout had its first "public" display at our Norfolk & Suffolk Narrow Gauge Modellers group meeting at Great Eastern Model shop in Norwich, May 2019.  The picture above is the only one taken at the event.  I look like I had momentarily dozed off though, but, at least, the layout was kept running by a helper.  We had four other layouts running that day plus a demonstration table.

In the morning there were one or two issues with coupling heights which caught me out, and a bit of glue and scenery on or near the track here and there, but that is to be expected with a new layout, even though it is cleaned up before showing!?  Later though, the layout ran fine.
The new Narrow Planet Bagnall saddle tank got a good running-in.

The Jouef Decauville setting out from Stonegate goods siding.

In the last week I have added another loco to the fleet.  I bought this Jouef Decauville off Ebay, it 
was in such good condition that I had to use it on the layout.  It is a 1980's example and runs well except having a wobble while in motion, the wheels seem to be bent, but I am not going to correct them for fear of breaking them, as they are about 35 years old.

 The 0-4-0 Decauville ,"Ash" seen at Shortwaite.

Also, new rolling stock are two 4-wheel coaches: a 009 Society/Ashby kit and a Dundas DM75 3rd class coach.


Friday, 19 April 2019

Additions to Shortwaite Hill

A new loco for Shortwaite. - an 0-4-0 Bagnall Saddle Tank.  It's the first Narrow Planet kit I have built.  It went together fine, but I found the kit a bit basic - not even smoke box door handles were supplied, I fabricated mine from brass rod.  I must add more detail at the engine shed facilities area.

A few items have been added to Shortwaite.  Two new locos, a gorgeous Bagnall Saddle Tank, and a rail bus bought second hand which has been modified and re-painted.  We have detailed the old garage yard, the dump at the side of the engine shed and a garden at the rear of cottages on the hill.

I found this Corgi Bedford bus conversion for sale at a local model shop.  It had an all over brown livery and was quite plain.  It runs on a Kato 103 4-wheeled chassis.  I shortened the whole bonnet by about 3mm, added a chassis frame under the engine compartment, some hand rails, a door step and re-painted it in SHLR livery.


In the back garden of one of the cottages a little girl plays with her Scottie dog while her father tends to young plants. 

At the rear of the old garage junk is building up, including a Land Rover under a tarpaulin.

Round the back of the engine shed certain parts have been dumped and are getting overgrown with weeds and nettles.

I am sure there will be more bits and pieces added as time goes on.


Names from the past


When certain layouts were broken up after their life I had a habit of keeping station signs.  I found a little bag of signs the other day (I am sure there are more somewhere!).  "Newlyn" (1991) was my first module in the original Norfolk Group of the 009 Society, the "Tregony & Newbridge Railway" (1988 - 1992) was my first completed static layout at home, I seem to have even kept the "Tregony Caves" sign from the caves entrance at the bottom of the ravine.  A couple of signs from the "Whitemoor" Station module (1993). "Carne" (1998) was my wife and I's first joint exhibition layout and I kept the home made Post Office sign and also one from the sheep market and coal yard.  The tiny station name board from a tiny micro layout called "Grumblewick Coombe" (2001), and two more micro layouts "Fotherham" (2009) and "Sampson Vale" (2002).

Sunday, 7 April 2019

Photo session - Shortwaite Hill

A few new photos of Shortwaite Hill

 Had a photo session on Shortwaite Hill the other day since some small details have been added, this view shows a passenger train at Shortwaite Station.  I need to add some railway rubbish next to the engine shed here.

"Rowan" leaves with a passenger train and passes the goods yard.

"Rowan" again shunting a single wagon.

"Hazel" seen in Stonegate goods siding.


"Rowan" arrives with passenger train at Stonegate. 

Shortwaite Village street.

Sunday, 10 March 2019

Additions to Shortwaite goods yard


A few small buildings have been added to the area below the village scene.  In the top photo, a goods store, small goods platform and coal bunkers are now in the goods yard, while my wife has been adding bushes and weeds.  The goods store was scratch built using Wills sheets again, the coal bunkers are second hand Peco, cut down, and the small goods platform made with match sticks.


While nearer the engine shed there is now a combined water tower and loco coal holder scratch built using Wills sheets and plasticard, and also a workmen's hut from a Wills SS15 coal yard kit.

Tuesday, 26 February 2019

Progress on the village scene


Shortwaite Village


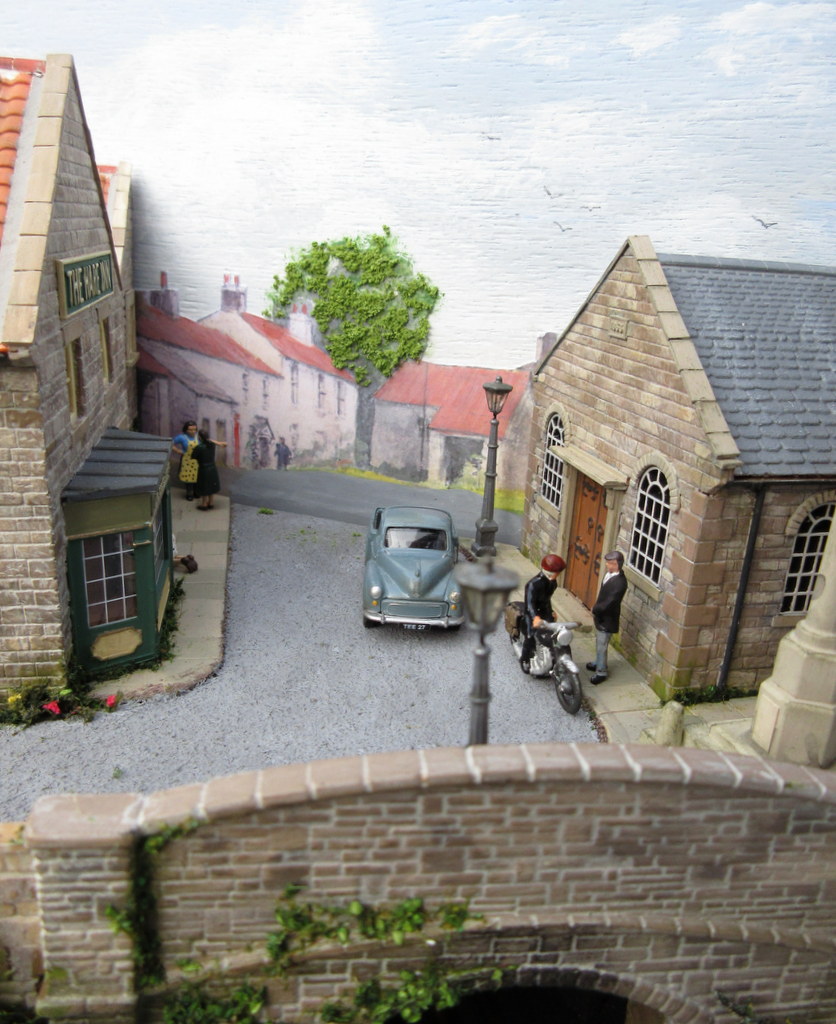
The edge-of-village scene at Shortwaite.

It was planned to fill the the top right-hand corner of the layout with a scene of village buildings, with a road leading down to the engine shed and goods yard area.  Four buildings were made, the Inn, a cottage next door (behind), an old garage and a chapel frontage.  All, apart from the garage, were made of Wills Dressed Stone, Pantiles and Slates with their cottage windows and buildings details packs.  The garage was made of all sorts to replicate an old road side garage in Arkendale, North Yorkshire that I saw on the internet.  The prototype is decrepit and over grown, made of a bit of everything: stone, brick, rubble, corrugated iron, wood and pan tiles.  Here is a photo of the building before painting:

The bare model of the tumbling down old garage in Arkendale.  A brick extension had been added at the left hand end at some point.


More walls were built from sanded Wills Coarse Stone or Peco Modelscene 5090 Stone Walls,  and rock faces were again made using the hydro-fibre compound, dry-brushed with brown-grey and green acrylics.  A war memorial was added next door to the chapel from a Wills SS72 Village scene.

  Cut up calendar pictures have been pasted on the back scene to give the village more depth.  In this picture the rocks have just been added after building walls at the side of the road way, around the garage yard, and behind the inn.  The rock compound has been dry-brushed with acrylics.


The village scene above the yet-to-be-built goods yard.


Saturday, 16 February 2019

The mysteries of Test Running


TEST RUNNING


Test running Shortwaite Hill at a recent Group meeting.  New buildings are appearing for the edge-of-village scene (top, right) and a Tea Van is awaiting customers in the siding.

I can't emphasise enough the need for test running layouts before displaying them in public.  It is obvious I know, but it needs to be done several times.  It seems that each time Shortwaite Hill is tested a new problem strangely rears it's head - and this is after many years of building and running different layouts.

Different layouts, different stock - different problems.

After the application of ballast and surrounding scenery, and adding platforms etc. I use the widest free-running vehicle intended to be run, and constantly push it around the layout to check for clearances.  Curves are carefully thought about, especially if using bogie vehicles.

Track cleaning: I first use the end of a lolly pop stick rubbed on the track tops to clean off lumps of stray scenery (the soft wood seems to be quite absorbent and doesn't damage the track) then I wipe over it again with a damp cloth wrapped around the lolly pop stick to clear pva specks etc., I clean the track yet again with an electronic cleaning solvent.

With narrow gauge, different kits, with all the varying sizes and chassis heights need special attention.  I run all the locos and stock in both directions, shuffling vehicles around in different train formations.  There will always be at least one troublesome vehicle that needs modification or some attention to couplings.

Tea anyone?


For a forthcoming group challenge competition, I have made this refreshment van using a Matchbox Toys 1960's Commer van.  It is fitted out with shelves loaded with plates, cups and cans, a sink with taps, fridge, water boiler, cakes and tea cups on the serving counter.