Tuesday, 23 June 2020

Basic Station Platform complete


I have just about finished the passenger platform for Raven Hill. 
It consists of a Highland Castings Waiting Room, Skytrex 7/201 GWR Ground Frame Hut (decreased in height), scratch built name boards using Slaters 6mm Letters, Peco LK-761 Seats (shortened) and LK-759 Station Platform Lamps and Renedra RN14 Palisade Fences.  The stonework on the face of the platform is some textured printed stone paper from Ebay, I wasn't convinced about it, but is looks quite good in the photos.


The goods storage facility is a Highland Castings Coal Yard Office, though I have added wooden double doors to make into a goods shed.  It needs a bit of internal strengthening before it is fitted to the layout though.

After a lot of head-scratching and searching on the internet, I have ordered some materials to build a group of four low relief buildings to be placed along the back scene, which will be a pub (of course), two cottages and a small warehouse.

The hot weather this week is putting-off good intentions to model anything though.   


Sunday, 7 June 2020

Some buildings on the way....


A few buildings have started to emerge for the layout.  The Engine Shed is finished, it is built using Wills 4mm Asbestos sheets used as corrugated iron, some re-used windows and parts from an old continental engine shed kit, and scratch built doors of plasticard.  With the painting, I tried to give it an "aged" look, it just needs some moss added on the roof and gutters.


The Passenger Shelter is a Highland Castings HCBK023 waiting room resin kit from Invertrain, I have just added a valance to the front of the roof (made by York Modelmaking).  The resin castings in the kit were rather warped and needed a lot of sanding on the backs of the panels to level them out.  Otherwise it went together well.  The platform is a plywood base, with embossed stone paper edges bought off the internet, the surface is Slaters Plastikard pebble walling with card edging stones..


The platform taking shape.  The name boards have just been freshly painted in this photo, I have used Slaters 1106 6mm high Letters & Numerals.  Some Renedra RN14 grey Palisade Fences (given to me by a friend) have been added along the rear.  A tiny station master's hut has been ordered which will be placed to the left of the passenger shelter.


Also being painted at present are a goods shed, coal bunkers and a water tower.  The goods shed is a Highland Castings HCBK015A Coal Yard Office, but I have added double doors in the rear so it can be used as a goods shed.  The castings were better on this building, but the rear wall was a good 2mm larger all round than the front wall!

....and on we go.

Sunday, 17 May 2020

Work in progress May

Just a quick posed photo of Browside Ledge and train with some of the scenic work done.  We are waiting for some more scenic products to arrive so that we can continue with the greenery.  The waterfall was made using eight coats of gloss varnish with painted gravel rocks added .  We then used some off-white coloured wool pulled into smaller threads and soaked in p.v.a. to straighten them a bit.  Using more gloss varnish, we stuck them to the water runs.  At the base splash areas we used small bits of cut up wool to create foamy water.  When dry, we carefully dry-brushed all the threads with matt white enamel. 

The first building under construction for the layout is this small engine shed.  It is made mainly using Wills Corrugated Asbestos sheets.  I used some parts off a second-hand 00 scale engine shed for the windows, vents and flue.  The rest is made using various plasticard.

Sunday, 10 May 2020

Raven Hill - A prologue

A back story.....for "Raven Hill"


View from Peak towards Baytown.

All great railways have their own history, so does mine........
Inspired by the history of "Fairbourne" in Wales, and "Ravenscar", North Yorkshire.


Penny Howe Light Railway
At the turn of the 20th century, a development was begun that was perched on 600 foot high cliffs of the North Yorkshire coast, and it was hoped, would rival the resorts of Scarborough and Whitby, it was to be known as “Peak”. 
An 15” gauge tramway was built to nearby Stoupe Brow quarry to supply building stone and aggregates, and a year later the tramway was extended across moorland to Penny Howe plantation for the supply of timber.  Roads and sewers were laid at the cliff top site, some houses and a hotel were built, but the new resort town of Peak never achieved any popularity because of the long trek down to its rocky beach and the development company went bankrupt.
The area was already known as the site of one of the earliest chemical works in the country producing Alum, used in the textile and tanning industry, and much earlier there was a Roman Signal Station constructed around 400AD, to warn of Saxon raids.
In the late 1950’s the tramway track bed still existed across the moor and past the quarry that it used to serve.  A local landowner revived much of the line for locals and tourists alike, even using some of the original rail found at the now dis-used quarry, and it was renamed the “Penny Howe Light Railway”.  It was extended to a total length of 4 miles to reach the small village of Howdale near the Scarborough Road so that goods could be transported via local farms to the coast, and passenger platforms were also built.  

The journey:  Howdale Station sits between Howdale village and the woods to the east.  The railway runs through woods for a few hundred yards, then out across open moorland.  There is a halt at Pye Rigg Farm, the line then runs along Browside ledge across a small bridge spanning a waterfall and into Raven Hill village station where there is a passing loop, small engine shed and goods shed.  About half a mile further on the line passes a junction to the old quarry.  After passing a small reservoir, the railway arrives at a small station terminus behind Peak village.

At Peak, the hotel is a fine establishment and there are also tea rooms serving refreshments.  The remains of the old alum works can be seen nearby and there are fine coastal paths northwards to Baytown and Whitby, one of them along the now closed standard gauge track bed, and also south to Hayburn Wyke hidden valley and waterfall. 


The remnants of the village high above the sea.


Monday, 4 May 2020

......Rocks

 ROCKS

Creating rock faces

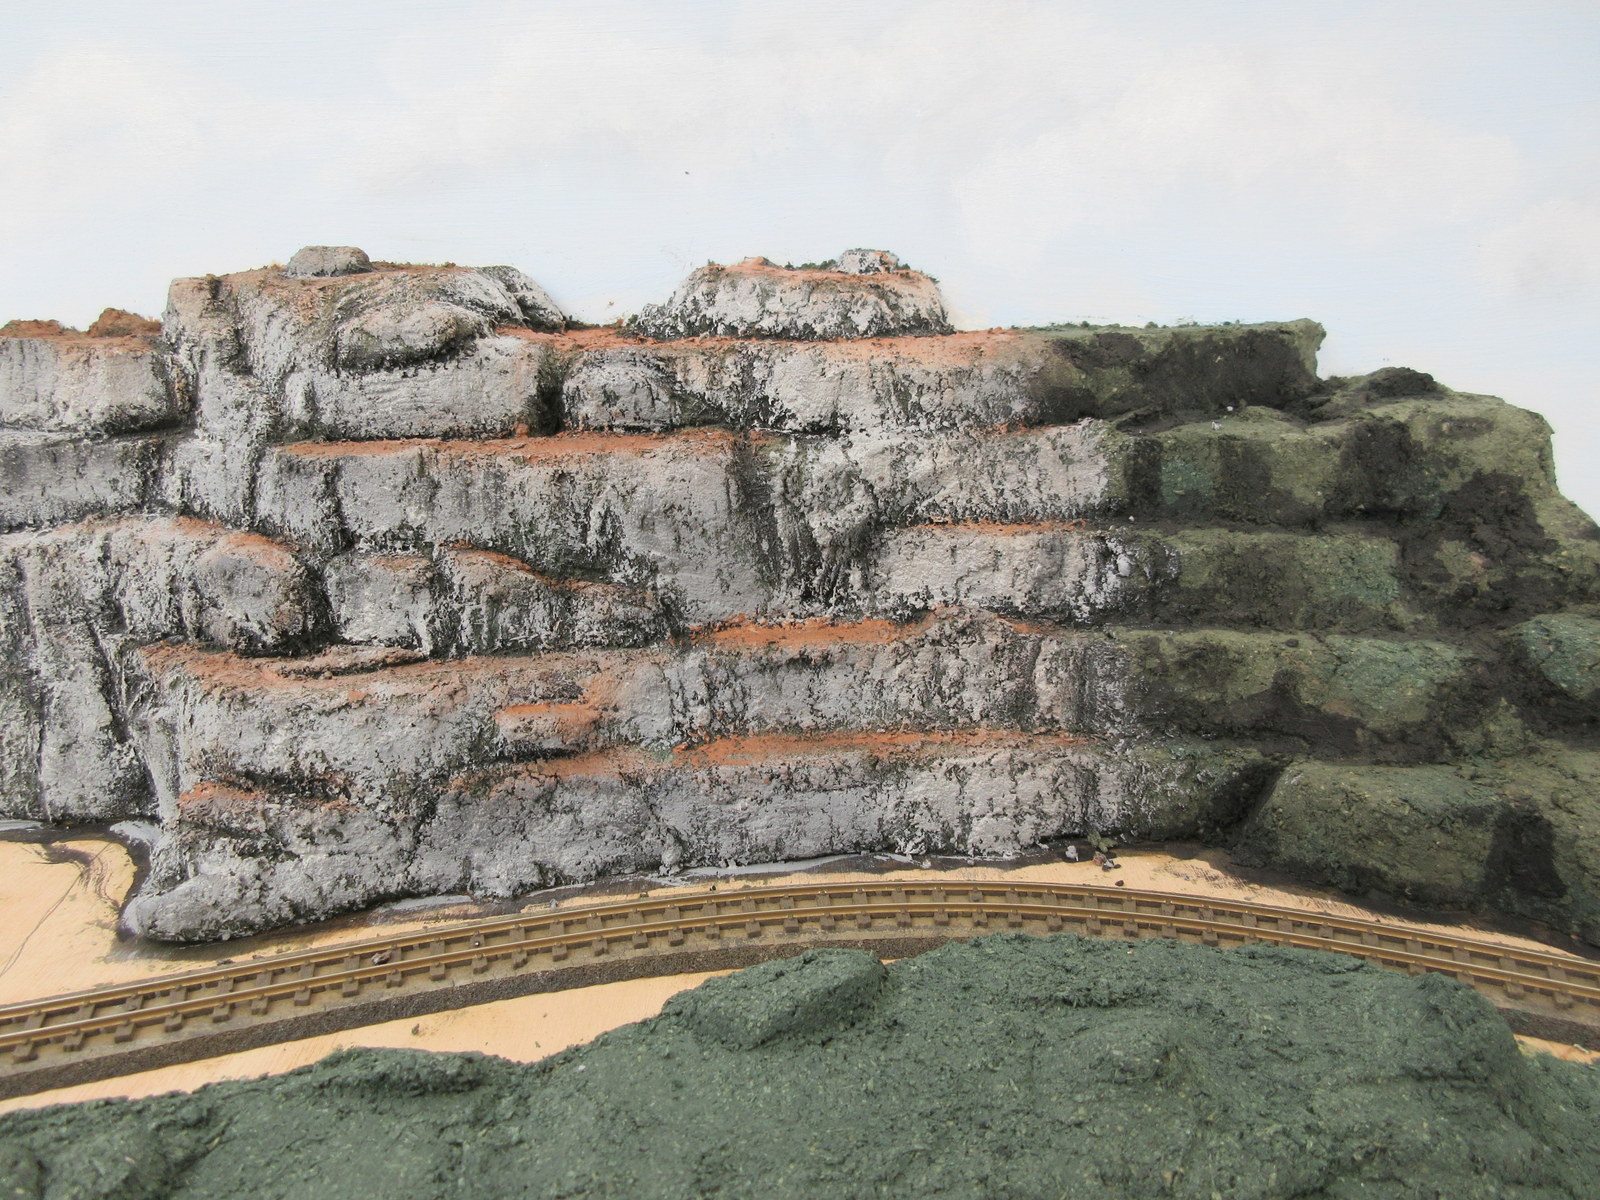
The Penny Howe Light Railway traverses a rocky ridge at Raven Hill near to the quarry that the railway originally served.  So in the last few days we have created the rock formations along the ridge.  Made of a mix of (greatest first) lightweight filler, sawdust, p.v.a, arcylic paint and water, the base colour, seen at bottom of the picture above, appeared totally wrong due to some unusually weak black paint, so we blackened all the crevices before adding various greys and browns.

This is an earlier photo at the end of the board showing polystyrene blocks, and my wife's trees on the end board. 

The completed area with the stream/waterfall being attended-to.

We are now adding coats of varnish to the stream, before adding all the greenery.

The layout will be called "Raven Hill" reflecting the prologue and history of the line, which I shall write about later.

Monday, 13 April 2020

Work in progress April

The station and village board being tested with "Oread" leaving the goods siding.  The site of the platform and a simple station building will be on the left.  The bottom right siding will lead to an engine shed.

Track laying and wiring has now been completed on the new boards.  I have wired the frogs on this layout - the first time I have ever bothered.  Trouble is, that's what it caused me: loads of bother.  Three attempts were made to wire up the station board. I think I have got it all sorted now.  It worked fine this morning, whether it will work tomorrow is another matter!

Two of these photos were taken in warm bright sunlight, so lots of shadows.  It is the first time the two boards have been joined electrically.

The bare boards showing the track layout.  The rear passing loops will be hidden behind a back scene.

"Wyvern" hauling two passenger coaches along what will be, a ledge in a hillside.  The rear coach has not gained glazing, door handles, or a roof yet.

Friday, 27 March 2020

Work in progress March

March 2020

The Minimum Gauge Models Industrial Diesel before couplings and weathering were added.

Another view of the loco, I think it now needs an exhaust too.

Meanwhile.....

I have now added track, point control and wiring to the "hillside" board of the new layout.  The size of  the board is 110cm x 51cm (43" x 20").  The track plan and wiring scheme has also been finally decided for the village board.
     The "hillside" board pictured in the sunshine.

A second bogie coach is also under construction.  Though I'm sure I have a pair of bogies for it somewhere, I have been unable to find them, so another pair of Peco GR-106's are on order.
This bogie coach is again built from Wills sheets and plasticard.

Sunday, 16 February 2020

Work in progress February


To address the "standing drivers" issue, I obtained some Andrew Stadden pewter figures, they are very nice castings and each comes with two pairs of separate arms so they can be suitably positioned.

This is the SDF1 Seated Figure version (Jacket Buttoned).


"Wyvern" in the first photo now has a Stadden SDF-2 Seated Driver, and "Drake" has a SFF-1 Seated Fireman.  They suit the little locos well.


Also newly built and here awaiting weathering are three more Unit Models wagons, a O-072 Box Van, an O-070 Open Wagon and an O-074 Tool Van.


Meanwhile I am also building my first "brass" kit.  This is a Minimum Gauge Models CL-001 "Classic Industrial Diesel".  It is going together very nicely, the parts fit very well.  I did not want to wreck the model by trying to solder it together, so I have used two-part epoxy resin.  It seems to hold the parts fine. 

The diesel so far, with the roof fitted loosely.  After burnishing the parts, initial joints were glued with the minimum of adhesive, then once dry, thicker webs of glue were added at the back of most of the joints to strengthen the structure.

Tuesday, 7 January 2020

Thanks!

Photo taken at last NSNGM narrow gauge group meeting.

A quick "thank you" to everyone worldwide for taking an interest in my little blog, it has now had over 11,000 views. 

Not everything goes to plan though.  I took my 09 scale "drawer module" to our last Group meeting, I found several faults.  Perhaps it's because I am trying new stock, locos and techniques.  

1: I am generally happy with the couplers that I am using, but the uncoupling magnets kept drawing wagons back, not magnetised to the wheels (as I am using Peco N gauge spoked nylon/plastic wheels) but to the couplings themselves, this is despite the magnets being purposely quite weak.

2: The locos and stock are struggling to cope with the Peco "Y" points, I have had this issue before with 009 stock.

3: Some wagons need more weight.

4: Some people have commented, quite rightly, that the locos need seated drivers as the roofs are quite low.  So, I will add a seat to the rear cab sheets (like the Heywood locos) and get some seated drivers added.  But, it's quite a job finding the right seated drivers in 0 scale. 

  "Standing" driver figures in danger of getting bruised noses!

So, a few modifications still to do.  It is certainly worthwhile trying these things out on a small module or diorama like this before building a larger layout (as planned).

Friday, 27 December 2019

Drawer Module complete

"Wyvern" and new passenger coach.

I have just about completed the first stage of this project on the first "drawer" module.  Greenery, lamp, railway junk, goods on the small platform, figures, a dog and a cat have been added.  I have also at last finished the short bogie coach. Here are a few pictures.

The passenger platform.

Diesel "Oread" at the loco siding.

 Steam loco "Drake" in the loco siding.

 "Oread" arriving with wagons.

 View of left-hand end.

View of whole drawer.

Now, I must get round to building some stock as more wagons are needed.

Tuesday, 3 December 2019

Scenery added on the drawer module

The drawer module with lighting and matt black surround.

A few quick photos now that the goods platform and some of the scenery has been added.  Small figures and details have to be added yet and I think some more detail to the track.

My wife has added much of the greenery to give the station a more rural feel.

A steam loco pottering about with a coal wagon.

The diesel reverses after receiving some fuel in the loco siding.

Tuesday, 19 November 2019

Update on "drawer modules"


The right-hand side of the drawer module after adding back scene, wall and the ground texture.  In this picture my wife has started to add greenery.


Above: My wife painted the "sky" on the module and the track was laid, careful measurement was made to try to get some sort of length of train inside the sidings, this is naturally very tight.  The idea is to have an approach (through) track (front right), a goods siding (front left), passenger platform (rear left) and loco siding (rear right).  Point control is by wire-in-tube.

I selected calendar pictures for the back scene and arranged them as best I could to get the appearance of nearby village buildings, and glued them on carefully.


The station building was scratch built using 4mm Wills Coarse Stone and Corrugated Asbestos sheets, and a fence made from plasticard. The buffer stops and coal bunker were made from strip wood and the walls are from a toy farm, similar to the old "Britains" walls.

Up in the top of the drawer I have fixed an rigid 50cm aluminium LED strip light, they were the perfect size.
A few details have to be installed now such as a water column, diesel tank, goods platform, and a sign board and bench on the passenger platform. 


Friday, 25 October 2019

New wagons and new daft idea.

The side tank loco with the two coaches.

Coach number 2 now has passengers and the roof has been fixed properly.  It is seen above with it's sister and the side tank.  I am still not convinced the coaches have enough height and will probably try to find a new way of getting the right proportions for future coaches.

At last I have decided upon names for the locomotives and ordered some nameplates from Narrow Planet, they will be named after weird and wonderful mythical creatures.
  
Meanwhile, I have built a couple of the Unit Models O-073 "Mine Tub" wagons, again using the Peco NR-121 N gauge wagon chassis.  They came out quite well and I have ordered another two to make a small rake:-
 
The story goes that the wagons were used to transport stone and aggregates for the construction of a planned new resort on the North Yorkshire coast across the moor from Penny Howe, all inspired by the real Ravenscar just south of  Baytown  (Robin Hood's Bay).  A story similar to that of Fairbourne in Wales.


Looking across to the few buildings at Ravenscar perched on top of the cliffs at the South end of Robin Hoods Bay.

Daft idea:-

I was given a old chipboard chest of drawers to use for storage in my garage but found there was not enough space to fit it in.  I decided to break it up, I pulled the drawers out and realised they were quite wide.  I placed some of  them upright, end to end, and could only think of one thing: that they could make nice modules to get something running more quickly for my 09 stock. 


The internal "bases" measure 510 x 120, just over 20" x 4.5".  The space is just enough to get two "Y" 009 turnouts either facing each other to sidings, or as trailing sidings.  They are ready-made base boards, though yesterday I adapted one of the drawers to: strengthen it, give a presentation arch, to allow sight to the tracks from behind and create a pelmet to fix LED lighting to.

Strengthened drawer with presentation arch and also an opening to neighbouring unit.

I kept four of the drawers to (hopefully) join them together to create a longer layout with up to four separate scenes.

Could I really create a layout in a space of 20" x 4.5"?

.....mad.