Tuesday, 21 May 2019

The first public display for Shortwaite Hill and new stock.


The layout is set-up a few days before the event complete with the title board/lighting support.


I used some 4000k natural white LED light strip for the lighting.  Two strips each 1.1metres long were fixed to the rear of the title board.  It gives an ideal brightness, not shown very well in the above picture though, which was photographed in a conservatory with bright sunlight outside.

Photo taken at Great Eastern Models, Norwich 11th May 2019 with a little helper.

The layout had its first "public" display at our Norfolk & Suffolk Narrow Gauge Modellers group meeting at Great Eastern Model shop in Norwich, May 2019.  The picture above is the only one taken at the event.  I look like I had momentarily dozed off though, but, at least, the layout was kept running by a helper.  We had four other layouts running that day plus a demonstration table.

In the morning there were one or two issues with coupling heights which caught me out, and a bit of glue and scenery on or near the track here and there, but that is to be expected with a new layout, even though it is cleaned up before showing!?  Later though, the layout ran fine.
The new Narrow Planet Bagnall saddle tank got a good running-in.

The Jouef Decauville setting out from Stonegate goods siding.

In the last week I have added another loco to the fleet.  I bought this Jouef Decauville off Ebay, it 
was in such good condition that I had to use it on the layout.  It is a 1980's example and runs well except having a wobble while in motion, the wheels seem to be bent, but I am not going to correct them for fear of breaking them, as they are about 35 years old.

 The 0-4-0 Decauville ,"Ash" seen at Shortwaite.

Also, new rolling stock are two 4-wheel coaches: a 009 Society/Ashby kit and a Dundas DM75 3rd class coach.


Friday, 19 April 2019

Additions to Shortwaite Hill

A new loco for Shortwaite. - an 0-4-0 Bagnall Saddle Tank.  It's the first Narrow Planet kit I have built.  It went together fine, but I found the kit a bit basic - not even smoke box door handles were supplied, I fabricated mine from brass rod.  I must add more detail at the engine shed facilities area.

A few items have been added to Shortwaite.  Two new locos, a gorgeous Bagnall Saddle Tank, and a rail bus bought second hand which has been modified and re-painted.  We have detailed the old garage yard, the dump at the side of the engine shed and a garden at the rear of cottages on the hill.

I found this Corgi Bedford bus conversion for sale at a local model shop.  It had an all over brown livery and was quite plain.  It runs on a Kato 103 4-wheeled chassis.  I shortened the whole bonnet by about 3mm, added a chassis frame under the engine compartment, some hand rails, a door step and re-painted it in SHLR livery.


In the back garden of one of the cottages a little girl plays with her Scottie dog while her father tends to young plants. 

At the rear of the old garage junk is building up, including a Land Rover under a tarpaulin.

Round the back of the engine shed certain parts have been dumped and are getting overgrown with weeds and nettles.

I am sure there will be more bits and pieces added as time goes on.


Names from the past


When certain layouts were broken up after their life I had a habit of keeping station signs.  I found a little bag of signs the other day (I am sure there are more somewhere!).  "Newlyn" (1991) was my first module in the original Norfolk Group of the 009 Society, the "Tregony & Newbridge Railway" (1988 - 1992) was my first completed static layout at home, I seem to have even kept the "Tregony Caves" sign from the caves entrance at the bottom of the ravine.  A couple of signs from the "Whitemoor" Station module (1993). "Carne" (1998) was my wife and I's first joint exhibition layout and I kept the home made Post Office sign and also one from the sheep market and coal yard.  The tiny station name board from a tiny micro layout called "Grumblewick Coombe" (2001), and two more micro layouts "Fotherham" (2009) and "Sampson Vale" (2002).

Sunday, 7 April 2019

Photo session - Shortwaite Hill

A few new photos of Shortwaite Hill

 Had a photo session on Shortwaite Hill the other day since some small details have been added, this view shows a passenger train at Shortwaite Station.  I need to add some railway rubbish next to the engine shed here.

"Rowan" leaves with a passenger train and passes the goods yard.

"Rowan" again shunting a single wagon.

"Hazel" seen in Stonegate goods siding.


"Rowan" arrives with passenger train at Stonegate. 

Shortwaite Village street.

Sunday, 10 March 2019

Additions to Shortwaite goods yard


A few small buildings have been added to the area below the village scene.  In the top photo, a goods store, small goods platform and coal bunkers are now in the goods yard, while my wife has been adding bushes and weeds.  The goods store was scratch built using Wills sheets again, the coal bunkers are second hand Peco, cut down, and the small goods platform made with match sticks.


While nearer the engine shed there is now a combined water tower and loco coal holder scratch built using Wills sheets and plasticard, and also a workmen's hut from a Wills SS15 coal yard kit.

Tuesday, 26 February 2019

Progress on the village scene


Shortwaite Village


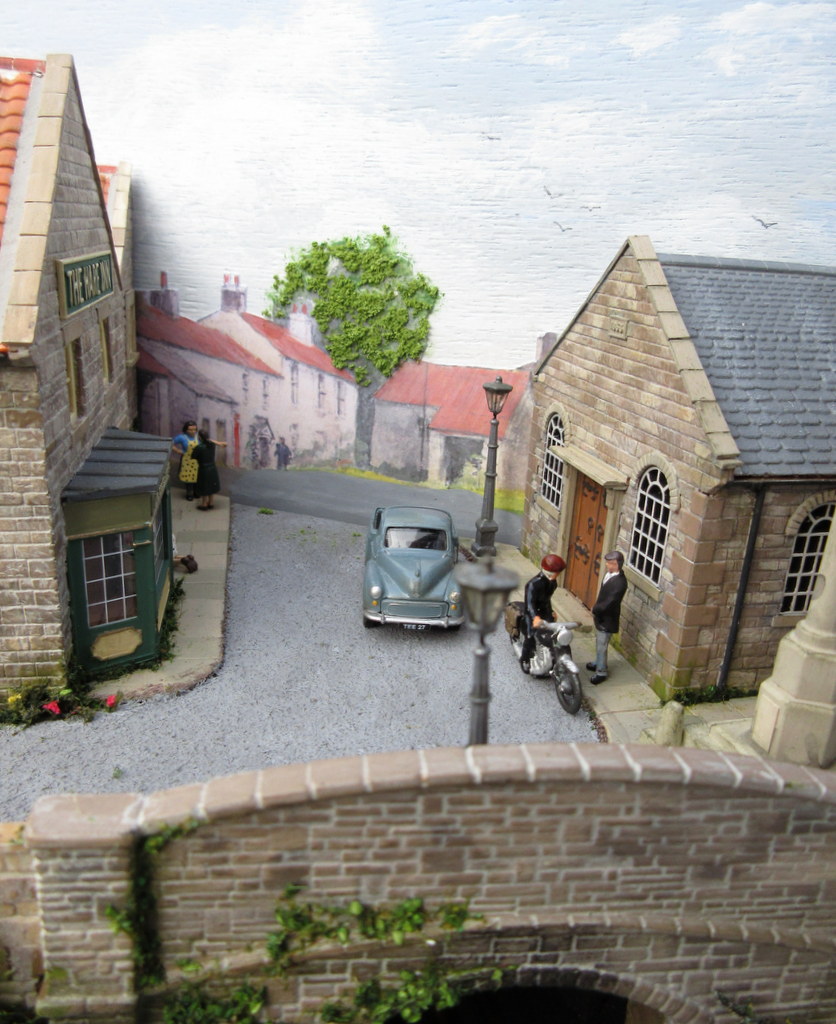
The edge-of-village scene at Shortwaite.

It was planned to fill the the top right-hand corner of the layout with a scene of village buildings, with a road leading down to the engine shed and goods yard area.  Four buildings were made, the Inn, a cottage next door (behind), an old garage and a chapel frontage.  All, apart from the garage, were made of Wills Dressed Stone, Pantiles and Slates with their cottage windows and buildings details packs.  The garage was made of all sorts to replicate an old road side garage in Arkendale, North Yorkshire that I saw on the internet.  The prototype is decrepit and over grown, made of a bit of everything: stone, brick, rubble, corrugated iron, wood and pan tiles.  Here is a photo of the building before painting:

The bare model of the tumbling down old garage in Arkendale.  A brick extension had been added at the left hand end at some point.


More walls were built from sanded Wills Coarse Stone or Peco Modelscene 5090 Stone Walls,  and rock faces were again made using the hydro-fibre compound, dry-brushed with brown-grey and green acrylics.  A war memorial was added next door to the chapel from a Wills SS72 Village scene.

  Cut up calendar pictures have been pasted on the back scene to give the village more depth.  In this picture the rocks have just been added after building walls at the side of the road way, around the garage yard, and behind the inn.  The rock compound has been dry-brushed with acrylics.


The village scene above the yet-to-be-built goods yard.


Saturday, 16 February 2019

The mysteries of Test Running


TEST RUNNING


Test running Shortwaite Hill at a recent Group meeting.  New buildings are appearing for the edge-of-village scene (top, right) and a Tea Van is awaiting customers in the siding.

I can't emphasise enough the need for test running layouts before displaying them in public.  It is obvious I know, but it needs to be done several times.  It seems that each time Shortwaite Hill is tested a new problem strangely rears it's head - and this is after many years of building and running different layouts.

Different layouts, different stock - different problems.

After the application of ballast and surrounding scenery, and adding platforms etc. I use the widest free-running vehicle intended to be run, and constantly push it around the layout to check for clearances.  Curves are carefully thought about, especially if using bogie vehicles.

Track cleaning: I first use the end of a lolly pop stick rubbed on the track tops to clean off lumps of stray scenery (the soft wood seems to be quite absorbent and doesn't damage the track) then I wipe over it again with a damp cloth wrapped around the lolly pop stick to clear pva specks etc., I clean the track yet again with an electronic cleaning solvent.

With narrow gauge, different kits, with all the varying sizes and chassis heights need special attention.  I run all the locos and stock in both directions, shuffling vehicles around in different train formations.  There will always be at least one troublesome vehicle that needs modification or some attention to couplings.

Tea anyone?


For a forthcoming group challenge competition, I have made this refreshment van using a Matchbox Toys 1960's Commer van.  It is fitted out with shelves loaded with plates, cups and cans, a sink with taps, fridge, water boiler, cakes and tea cups on the serving counter. 


Saturday, 19 January 2019

A Village Inn

The Hare Inn

Side view of The Hare Inn

In the upper right corner of the layout there will be an "edge of village" scene, being the rear of some buildings at Shortwaite.  First, I had to make up strange-shaped removable sub-baseboard for the village and goods yard scene to gain access to the track below for cleaning and no doubt recovering the odd derailment.  There is an access road planned from the village on the hill down to the station, so a road base had to be devised.  The key building, and the most dominant is the inn at the top of the hill, and I have at last been able to finish it.  All other structures will be placed around this.  

Front view (which can only be seen from the right side of the layout!?).

View showing the removable sub-base and the dominant position of the building.


It has been made with Wills Dressed Stone, Pan Tile sheets, and also their Doors and Windows, with a few other odd bits added: a bay window from a continental chemist kit, a piece of Wills Sheet & Batten roofing, Corner Fillets, and plain Brick, some plasticard, Evergreen Rod and Slaters letters.  A few errors were made when cutting out the windows, but I persevered.  I filled in under the ridge tiles with a D.I.Y filler.  Flashing was made using a dried spectacle & lens wipe strong tissue.

Rear view.
It was painted with Humbrol enamels, 28, 110, 121, for the walls and a few red tones using 100  mixed with 121 and a tiny amount of matt black for the chimney, thinned 71 cream for the windows, and 75, 80 and 28 for weathering.

Now I just have to plan the buildings around it.


Tuesday, 18 December 2018

New (second hand) Stock, and Peco GR-101 Couplings - December 2018

Secondhand Stock - December 2018

Three refurbished SHLR vehicles.

Whilst the track, locomotives and one or two other items are new, many elements of the Shortwaite Hill layout are second hand, old kits or odd items from the "bits box".  And, after many years of collecting 009 items, and then selling them, I have gone back to basics in many ways too, and this has been enjoyable.  


I recently bought some second hand stock from a club/society event to refurbish, but I can't find where I've put them.  I have conducted many searches of my cupboards, boxes and all around the house and sheds, but no luck.  So, I have refurbished two green second hand Dundas 4-wheeled coaches that a club member kindly sold sold me.  These were stripped using a 50/50 Dettol & water mix and it worked well, with just a few stubborn bits of paint in the corners here and there.  They were then re-wheeled and had new couplings added, with brass door handles, gas pipe, new roofs, drain strips and lamp tops, part new seats, passengers, glazed, re-painted and lettered.  They became No's 9 and 10. 

    Coach numbers 9 and 10.

I the absence of the missing S/H stock which contained a brake van of unknown origin, I searched the bits box again to see if I could build one from other parts I had.  The result is pictured below.

Another re-built item, guards/brake No.21

Despite it's unusual appearance and end doors I like it, and it has cost me nothing apart from the paint, some brass wire and the lettering.  The body is from a old Dundas DM48 Festiniog Brake Van and the chassis is from an old Egger-Bahn tender.  I have retained the original couplings.

Couplings

For me, 009 couplings have always been my nemesis.  I survived using Bemo/Egger couplings for many years.  From the outset on this project I decided that I would only use one coupling loop per vehicle except brake vans and the odd wagon for match trucks.  But, what couplings to use?  I don't get on with the Greenwich type, nor can I make them properly, I find the Bemo and the newer Peco GR-102 Couplings too large and bulky.

So I decided to go "retro" and use modified GR-101 couplings.  These have been around for donkeys years and are not very reliable in their original state using two loops per vehicle, and they require a bit of work to make them better.  And, it has to be said, more extensive testing still has to be carried out.

As purchased: the GR-101 coupling made up and in their component parts.  
(You can see how the wire loop ends do not line-up)

To use these, once the two halves have been glued together I thin the buffer head vertically and file to a curve.  With a small triangular file, I file a slight slope the back of the hook.  I then coat the buffer head with Plastic Weld or similar to smooth the surface.  I drill out the coupling loop holes with a 0.5 drill to make sure they are clear.  The bends on the wire loops are not always properly formed and it essential to get the two ends to line-up exactly, otherwise the loops will rest at strange angles instead of sitting on the coupling hook.  Once a little correction is made to these it is easy to spring them onto the coupling and then glue the complete unit on to the vehicle using Plastic Weld, super glue or two-part epoxy and a coupling height gauge.  To me they look no worse than other makes of coupling.

Couplings fitted.

As yet for this project, I have to devise a reliable uncoupling device. 

I will report back as to the reliability of the couplings as time goes on.


Wednesday, 28 November 2018

"Colours"

Colours - for buildings and stock.


Well, this subject can be quite complicated.  After over 35 years of narrow gauge railway modelling I seem to have developed my own colour palette of preferred tones for buildings and stock.  I am quite "old school" and prefer to use Humbrol enamels brushed on, sometimes using thinners to weaken or dilute the paint, depending on what I am coating.  I personally find acrylics too thick, and this drowns-out the detail.  The formulation of Humbrol enamels has changed in recent years though, it now seems more oily, and the shades can differ from one batch to another, but for some reason I still stick with it.

Speaking about the colours of buildings in particular, for me, it can be a very laborious task, using a system of base colours, tints, detailing and weathering:

Base colour: The general shade of the whole building as seen usually when squinting the eyes.
Tints: The differing tones of stones, bricks or slates etc.
Detailing: Doors, windows, gutters, hinges etc.
Weathering: Giving that "worn" look with stains, rust, old mortar, moss etc.

In the early days I chose colours too literally and they turned out too dark, mainly because most of the time they were being viewed indoors, away from bright daylight.  I now use generally lighter shades, and this applies to the scenery too with lighter scatter's, foliage and terrain colours.

My own railways recently have been based on North Yorkshire buildings.  I do not know much about buildings, but I do like to get a vernacular impression with the stonework, roofs, and the general style of the buildings and also a constant tone to them with paints.  Welsh, Derbyshire, Cumbrian, Cotswold, Cornish stone buildings will all have different tones.  Brick buildings too appear in different shades depending on the clay's used and the manufacturer, some buildings show very consistent colours, others show different shades of brick ranging from light pink to dark red, nearly black, not forgetting other geographical areas (ie: London) displaying buildings with grey bricks in different tones.

Building in Runswick Bay, North Yorkshire.

Above is a photo of a cottage in Runswick Bay and shows the general colours of many of the buildings in the area, especially those on the coast.

"Beck Loft" on the Whitsend Tramway.  I used blacks more then, and looking back it appears too harsh. 

On the "Whitsend Tramway" many of the buildings were painted with a mortar grey colour, then the sandy tones dry-brushed on, with random individual stones tinted lighter and darker.  It was a long process.

Two buildings on "Raven Gill" using the same technique.  Light weathering with stains on roofs and mossy areas on walls and near some down pipes.

The grubby engine shed for "Shortwaite Hill" using a quicker process.

For "Shortwaite Hill" I have used a different process.  Rather than painting random individual stones I first gave the buildings a general base coat of mixed Humbrol matt 121 (a light buff colour) and 29 (brown) leaving random lighter and darker areas and left the model for 48 hours to completely dry.  

Then thinned matt 28 light grey was washed all over the building and wiped off with a cotton cloth to leave mortar lines in the grooves.  This was the main stonework done. With the roof painted with matt 27 grey, and doors, barge boards etc. painted with the livery colours (satin brown & cream) and allowed to dry, work could now begin on the weathering. 

Thinned matt 75 was washed into mortar in some lower areas where damp may appear, and dry brushed matt 80 green used to represent moss. Matt 75 was also dry-brushed on dirty doors etc. where wear and grime would appear.

For the roofs a light grey (No.28) was used dry brushed vertically to show roof staining with a tiny amount of matt 80 green also applied in odd areas and corners. 

I hardly use black(s) at all, and usually represent black with matt 75 Bronze Green and 66 Olive Drab.

Apart from Satin black (85) all these colours (mentioned above) were used on the engine shed.  
The "Humbrol" names are shown below.
110 Natural Wood and 121 Pale Stone mixed for the base stone colours,
29 Dark Earth also for gutter dirt.
28 Camouflage Grey for mortar.
27 Sea Grey for the slates.
75 Bronze Green for mortar loss and damp recesses.
80 Grass Green for moss.
110 Natural Wood and 100 Red Brown mixed for rust.
110 Natural Wood and 121 Pale Stone thinly mixed for brick arch headers.
133 Satin Brown and 71 Satin Oak Cream doors, barge boards, gutters.
66 Olive Drab, oil and grubby marks on doors. 
64 Light Grey for water staining on roof.
33 Matt Black for the main loco door entrance hinges.

I use the same type of paint for locomotives and stock, but using mainly the livery colours, plus 66 Olive Drab to represent dark areas such as under frames.  Goods stock is painted 64 grey, and roofs 27, a darker grey, this is stippled on, and as it dries quite quickly it leaves a slight textured surface.  Weathering: rust, stains and grime are represented too by gently dry brushing, and also using thinned 66 olive drab.   


Sunday, 25 November 2018

Shortwaite Station developments


A view of the upper station "Shortwaite" under construction.

While the hill scenery and cottage gardens are being created, work on Shortwaite Station has been under way.  A platform, retaining walls and fencing has been built, and also a station building.  A new loco acquisition, a Minitrains Krauss 0-4-0 has been purchased - seen as new in the above photo.  I don't know whether or not to Anglicise and repaint this yet, or obtain a new body kit for it.  Also seen is the engine shed with it's base colours applied.

The station building under construction.  It was mainly made with Wills materials sheets: sanded Coarse Stone and roof Slates, with added plasticard details.

The engine shed was made in much the same way as the station building, also with laser cut card window frames.

Doors and barge boards are scratch built with plasticard.  Because of the angle the engine shed is being set, it is cut off  at 45 degrees on the right side of the main roof. 

When this area and it's ground cover is constructed, I must plan the goods yard and upper village scene.  

Monday, 12 November 2018

Houses on the Hill

A couple of cottages have appeared on the hill along with shrubs and trees.

Scenic work continues on "Shortwaite Hill".  Two cottages with walls have been added plus shrubs, trees and flowers applied by my wife around the hill and station area.  The cottages are old Playcraft (and later Hornby) plastic Thatched Cottage kits modified with pan tile roofs, guttering and barge boards.  Here are some posed shots with the Bagnall "Hazel".

Appearing under the bridge carrying the lane over the top.

At "Stonegate" Station.  Lamps and a station name board have also made an appearance.

Running in to "Stonegate" station.  I have a soft spot for the Egger-Bahn "P43" coaches, so I obtained one from the 009 Society sales stand for restoration.  Originally green as below, I repaired two roof corners as they were broken, then re-painted the coach.