Friday, 27 December 2019

Drawer Module complete

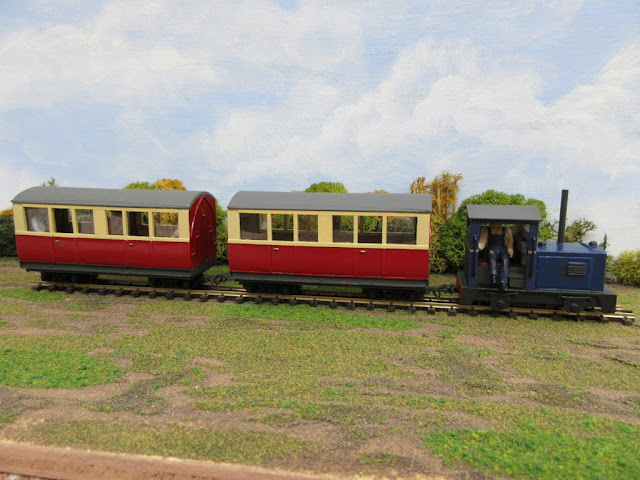
"Wyvern" and new passenger coach.

I have just about completed the first stage of this project on the first "drawer" module.  Greenery, lamp, railway junk, goods on the small platform, figures, a dog and a cat have been added.  I have also at last finished the short bogie coach. Here are a few pictures.

The passenger platform.

Diesel "Oread" at the loco siding.

 Steam loco "Drake" in the loco siding.

 "Oread" arriving with wagons.

 View of left-hand end.

View of whole drawer.

Now, I must get round to building some stock as more wagons are needed.

Tuesday, 3 December 2019

Scenery added on the drawer module

The drawer module with lighting and matt black surround.

A few quick photos now that the goods platform and some of the scenery has been added.  Small figures and details have to be added yet and I think some more detail to the track.

My wife has added much of the greenery to give the station a more rural feel.

A steam loco pottering about with a coal wagon.

The diesel reverses after receiving some fuel in the loco siding.

Tuesday, 19 November 2019

Update on "drawer modules"


The right-hand side of the drawer module after adding back scene, wall and the ground texture.  In this picture my wife has started to add greenery.


Above: My wife painted the "sky" on the module and the track was laid, careful measurement was made to try to get some sort of length of train inside the sidings, this is naturally very tight.  The idea is to have an approach (through) track (front right), a goods siding (front left), passenger platform (rear left) and loco siding (rear right).  Point control is by wire-in-tube.

I selected calendar pictures for the back scene and arranged them as best I could to get the appearance of nearby village buildings, and glued them on carefully.


The station building was scratch built using 4mm Wills Coarse Stone and Corrugated Asbestos sheets, and a fence made from plasticard. The buffer stops and coal bunker were made from strip wood and the walls are from a toy farm, similar to the old "Britains" walls.

Up in the top of the drawer I have fixed an rigid 50cm aluminium LED strip light, they were the perfect size.
A few details have to be installed now such as a water column, diesel tank, goods platform, and a sign board and bench on the passenger platform. 


Friday, 25 October 2019

New wagons and new daft idea.

The side tank loco with the two coaches.

Coach number 2 now has passengers and the roof has been fixed properly.  It is seen above with it's sister and the side tank.  I am still not convinced the coaches have enough height and will probably try to find a new way of getting the right proportions for future coaches.

At last I have decided upon names for the locomotives and ordered some nameplates from Narrow Planet, they will be named after weird and wonderful mythical creatures.
  
Meanwhile, I have built a couple of the Unit Models O-073 "Mine Tub" wagons, again using the Peco NR-121 N gauge wagon chassis.  They came out quite well and I have ordered another two to make a small rake:-
 
The story goes that the wagons were used to transport stone and aggregates for the construction of a planned new resort on the North Yorkshire coast across the moor from Penny Howe, all inspired by the real Ravenscar just south of  Baytown  (Robin Hood's Bay).  A story similar to that of Fairbourne in Wales.


Looking across to the few buildings at Ravenscar perched on top of the cliffs at the South end of Robin Hoods Bay.

Daft idea:-

I was given a old chipboard chest of drawers to use for storage in my garage but found there was not enough space to fit it in.  I decided to break it up, I pulled the drawers out and realised they were quite wide.  I placed some of  them upright, end to end, and could only think of one thing: that they could make nice modules to get something running more quickly for my 09 stock. 


The internal "bases" measure 510 x 120, just over 20" x 4.5".  The space is just enough to get two "Y" 009 turnouts either facing each other to sidings, or as trailing sidings.  They are ready-made base boards, though yesterday I adapted one of the drawers to: strengthen it, give a presentation arch, to allow sight to the tracks from behind and create a pelmet to fix LED lighting to.

Strengthened drawer with presentation arch and also an opening to neighbouring unit.

I kept four of the drawers to (hopefully) join them together to create a longer layout with up to four separate scenes.

Could I really create a layout in a space of 20" x 4.5"?

.....mad.

Tuesday, 1 October 2019

The Planned 09 Layout

The baseboard under construction.

A start had been made on the baseboard for the 09 layout a few weeks ago.  Above is how it looks at the moment, there are two boards each 43" x 20" (109cm x 51cm) mainly made in 6mm ply wood.  The track bed will sit on the raised supports, the area at the centre front will be a dropped rock face.  It is hoped that on the left hand board will be the passenger station, goods siding and low-relief village back scene, the right-hand board will mainly be a track along a rock ledge running over a bridge over a small waterfall, with a siding to a small engine shed at the left-hand end.  There will be a back-scene board about 4.5" from the back with two storage loops, one on each board.

Photo of full scale initial plan.  In the end I decided to change the position of the engine shed siding. The name of the railway is going to be "The Penny Howe Light Railway".

The purpose for building the line in the first place has yet to be further researched and decided upon! - as has the village name, and the names of the locomotives.

Coach Number 2 has now been built and painted now to pair -up with the first one:-
The new coach is in the centre, made exactly the same way as the first using a Hornby GW 4-wheeler as a basis, with Peco bogies.


Friday, 30 August 2019

Some new 09 Stock

A second steam loco by Shapeways, Tebee Models.

I bought a second steam loco to go with the tank loco I already bought, this time a saddle tank, again mounted on a Kato 4w tram chassis.  The first loco now has a driver, a Noch example who was in a (I thought) ridiculous pose, so I cut-off his right arm and re-modelled a new one sculpted with Milliput.  The diesel loco also has a driver too, a bargain purchase of unknown make.  He had his head broken-off when purchased, in fact I had trouble finding it, but he needed facing to the left, so I filed his neck to fit, re-glued, and re-painted him 

A driver for the side tank loco.

New driver in the diesel too.

I had in mind that I could build an 09 coach from a Hornby GW 4-wheeler so I bought two second hand ones in a local shop.  It was stripped down to the body less it's window apertures and raised beading, the roof less it's window glazing and the chassis frame less brake gear and wheels as under:-


The door grooves were filled, then new window frames were made with Evergreen 1.5mm square rod and strip.

New window frames and beading added to the coach sides.

A chassis was made using some Wills sheet and some Peco GR-106 bogies, with the bogies sitting on thin nylon washers to aid free rotation.

After fitting some plasticard seats and glazing I now have a completed "prototype" coach for the new line:-
The coach seats at least eight "0" scale figures and I have obtained some from China for this purpose, they need a little effort to get them ready.  The coach is just about the right height for the railway, I am assuming the the floors are in a "well" to keep the centre of gravity low and good stability on the line.   

Thursday, 25 July 2019

09 Beginnings - couplings - wagons - steam loco.

Two Unit Models Open Wagons placed on a 7.5" radius curve to check clearances.

As a new scale/gauge is being contemplated, a number of experiments have to be carried-out.  Ensuring couplings will fit the stock is one of them.  How will they best operate?, and when fitted, will the length of the couplings allow clearance between ends of the stock on sharp curves?

I chose to stick with the Peco GR-101 009 couplings as they are right for me.  Though I had to check how they would fit the first stock I have built, which are a pair of open wagons.  They fit the N scale NR-121 wagon chassis OK, but when the frames of the wagons are placed over the top it only just allows for the coupling loop to lift as the frames are 2mm thick.  There is an advantage that the wagons will couple closer, but the above picture shows that on a 7.5" radius curve the corners of the wagon nearly touch.  It is best to check these sort of things as one can easily lay track and find later that the stock binds.

  I found the the Peco 009 couplings reacted nicely to an ordinary 13mm round craft magnet if laid underneath the track.


Preparing the chassis:-
The Peco NR-121 10ft wagon chassis as intended for N scale.

The buffers and brake gear were cut-off the Peco wagon chassis leaving the axle boxes, then the 009 couplings were slotted into the coupling pockets as seen below.

Spoked nylon wheels are supplied with these particular chassis.  In my experience the spoked wheels are a better gauge than the disc type supplied with other types of Peco N gauge wagon chassis and they certainly traverse turnouts better.  They are also very free-running.

The Shapeways/Teebee 09 side tank loco is just about finished.  A couple of hours were spent carefully sanding the plastic as flat as I could get it without putting the body under too much strain.  It was primed with Humbrol 01 Grey Primer, then the most visible parts of the loco were flatted off again. It was finished with Revell Dark Blue satin number 350, also using a mixed Humbrol grey/ satin black for the skirts, smoke box and chimney.  A whistle was crafted from 1mm and .45mm brass wire and then medium length handrail knobs were added along with hand rail wire.
The steam loco with two of the Unit Models wagons.

The Unit Models diesel and two open wagons.  No weathering has been applied just yet.

Tuesday, 9 July 2019

What? Another scale?

First "09" model: A Unit Models O-081 Diesel Loco Body built on a Kato 103 Tram Chassis.

With my "Shortwaite Hill" 009 project coming to some sort of completion, I was attracted (not for the first time) by "09" scale, (7mm scale running on 15" ((minimum gauge)) or 18"gauge track).  Re-reading Christopher Payne's and Bill Flude's recent articles in the Railway Modeller magazine, and also seeing one of our Group members new scratch built models only reinforced my curiosity, and again, ideas of a layout sprang into my mind.

I can use the same 009 or "N" gauge mechanisms that I am already familiar with, models would be slightly chunkier, and easier to see and handle.  009 track could be used (though really slightly small in scale) but I could disguise the sleepers in weeds and dirt as I usually do.  

The plan at first is to keep things simple.  I opted to send for some Unit models resin kits, available from Frizinghall Models & Railways.  They had been very helpful last year when I bought some Unit Models wagons via another retail outlet.  When the kits arrived, I found one of the chassis frames was missing.  On contacting Frizinghall, they manufactured a replacement resin frame and sent it to me very kindly free-of-charge.  I had enjoyed building resin kits when I made the Smallbrook Gn15 models.

Some of the Unit Models 09 wagons purchased.

I also sent for a Teebee 3D printed 09 loco body from Shapeways.  My previous experience with 3D printed railway models has not been great, and I knew that the finish of the plastic would be rather rough, but I would persevere this somehow.  I also had an idea in mind for a couple of passenger coaches.

Teebee Models 09 Side Tank body with half cab.

Never having modelled "0" scale before, I found out that the British, European and US 0 scales are all slightly different and soon noticed the difference in size of the figures that were available on the local model shops shelves.

So, to build a loco and weigh it all up.

I built the Unit Models Diesel and finished it in dark blue:

An easy kit to make.  Now I have to find a driver for it somehow.

Monday, 8 July 2019

A PW Train

The complete PW train from above hauled by the diesel tractor.

A permanent way train has been added to the SHLR stock.  It consists of a Meridian Stone wagon, a wagon built from an old bogie tool wagon (now on an Egger Tender chassis),  an H0e Roco Gondola bogie wagon and a modified Dundas Freelance 3rd coach, along with Coopercraft tools, ballast and sleepers etc.

 The PW train on the upper level hauled by Bagnall "Hazel".

The chance to buy a PECO "Charles" kit at a good price resulted in this tram loco.  I had never built a Charles kit before, but it went together OK while the footplate was adapted to take a Kato 103 4-wheeled tram chassis.  I have added hand rails and a brass whistle too.  It is still to be named, and also needs a driver.

The new tram loco also seen with a new Dundas DM03A Guards Van and the PW crew coach.

Wednesday, 12 June 2019

Diesel Tractor

The diesel tractor at Shortwaite engine shed.

One of our N&SNGM Group members was selling some of his 009 stock, and amongst them was this cobbled-together diesel.  I had seen it on his layout a couple of years ago and for some reason I really liked it.  Part of the body is the cab from a Roco 6-wheeled diesel and it runs on a shortened Kato 103 tram chassis.  I added some weight to the loco, and improved the rear lower cab sheet and added buffer beams.  After a repair to the chassis it ran well, so it was painted in the SHLR livery but retains it's original number "8" plates.  A driver was also added after these photos were taken and I am making a PW train for it to haul.

The diesel tractor in the Shortwaite goods siding.

Tuesday, 21 May 2019

The first public display for Shortwaite Hill and new stock.


The layout is set-up a few days before the event complete with the title board/lighting support.


I used some 4000k natural white LED light strip for the lighting.  Two strips each 1.1metres long were fixed to the rear of the title board.  It gives an ideal brightness, not shown very well in the above picture though, which was photographed in a conservatory with bright sunlight outside.

Photo taken at Great Eastern Models, Norwich 11th May 2019 with a little helper.

The layout had its first "public" display at our Norfolk & Suffolk Narrow Gauge Modellers group meeting at Great Eastern Model shop in Norwich, May 2019.  The picture above is the only one taken at the event.  I look like I had momentarily dozed off though, but, at least, the layout was kept running by a helper.  We had four other layouts running that day plus a demonstration table.

In the morning there were one or two issues with coupling heights which caught me out, and a bit of glue and scenery on or near the track here and there, but that is to be expected with a new layout, even though it is cleaned up before showing!?  Later though, the layout ran fine.
The new Narrow Planet Bagnall saddle tank got a good running-in.

The Jouef Decauville setting out from Stonegate goods siding.

In the last week I have added another loco to the fleet.  I bought this Jouef Decauville off Ebay, it 
was in such good condition that I had to use it on the layout.  It is a 1980's example and runs well except having a wobble while in motion, the wheels seem to be bent, but I am not going to correct them for fear of breaking them, as they are about 35 years old.

 The 0-4-0 Decauville ,"Ash" seen at Shortwaite.

Also, new rolling stock are two 4-wheel coaches: a 009 Society/Ashby kit and a Dundas DM75 3rd class coach.