Wednesday, 28 November 2018

"Colours"

Colours - for buildings and stock.


Well, this subject can be quite complicated.  After over 35 years of narrow gauge railway modelling I seem to have developed my own colour palette of preferred tones for buildings and stock.  I am quite "old school" and prefer to use Humbrol enamels brushed on, sometimes using thinners to weaken or dilute the paint, depending on what I am coating.  I personally find acrylics too thick, and this drowns-out the detail.  The formulation of Humbrol enamels has changed in recent years though, it now seems more oily, and the shades can differ from one batch to another, but for some reason I still stick with it.

Speaking about the colours of buildings in particular, for me, it can be a very laborious task, using a system of base colours, tints, detailing and weathering:

Base colour: The general shade of the whole building as seen usually when squinting the eyes.
Tints: The differing tones of stones, bricks or slates etc.
Detailing: Doors, windows, gutters, hinges etc.
Weathering: Giving that "worn" look with stains, rust, old mortar, moss etc.

In the early days I chose colours too literally and they turned out too dark, mainly because most of the time they were being viewed indoors, away from bright daylight.  I now use generally lighter shades, and this applies to the scenery too with lighter scatter's, foliage and terrain colours.

My own railways recently have been based on North Yorkshire buildings.  I do not know much about buildings, but I do like to get a vernacular impression with the stonework, roofs, and the general style of the buildings and also a constant tone to them with paints.  Welsh, Derbyshire, Cumbrian, Cotswold, Cornish stone buildings will all have different tones.  Brick buildings too appear in different shades depending on the clay's used and the manufacturer, some buildings show very consistent colours, others show different shades of brick ranging from light pink to dark red, nearly black, not forgetting other geographical areas (ie: London) displaying buildings with grey bricks in different tones.

Building in Runswick Bay, North Yorkshire.

Above is a photo of a cottage in Runswick Bay and shows the general colours of many of the buildings in the area, especially those on the coast.

"Beck Loft" on the Whitsend Tramway.  I used blacks more then, and looking back it appears too harsh. 

On the "Whitsend Tramway" many of the buildings were painted with a mortar grey colour, then the sandy tones dry-brushed on, with random individual stones tinted lighter and darker.  It was a long process.

Two buildings on "Raven Gill" using the same technique.  Light weathering with stains on roofs and mossy areas on walls and near some down pipes.

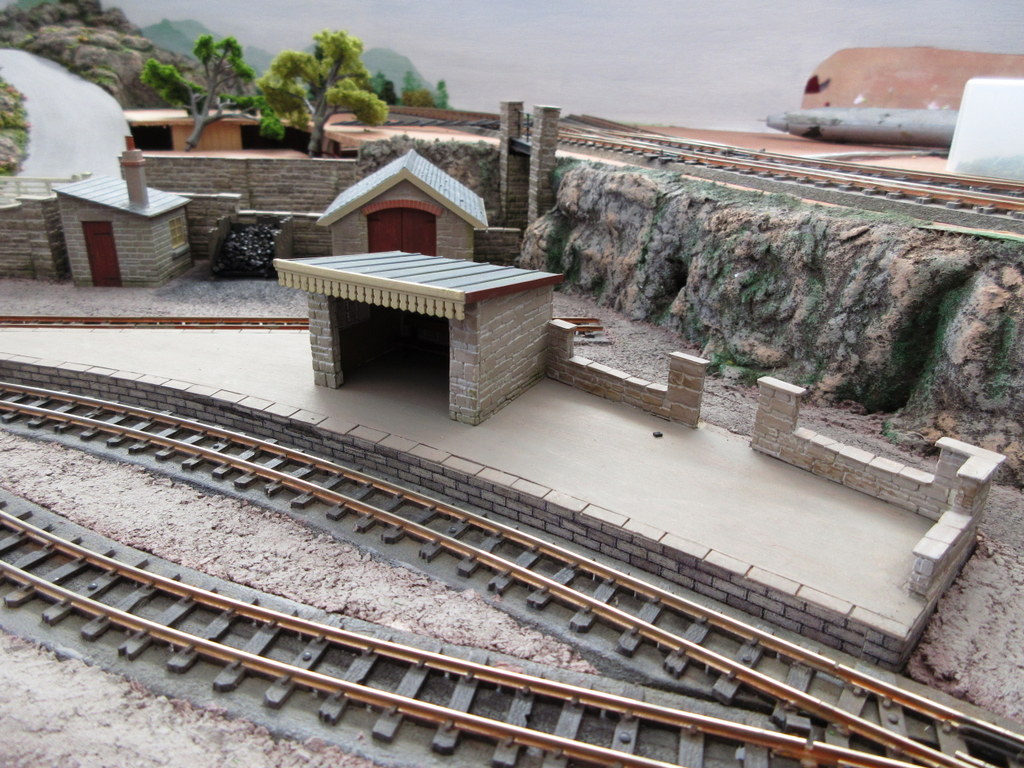
The grubby engine shed for "Shortwaite Hill" using a quicker process.

For "Shortwaite Hill" I have used a different process.  Rather than painting random individual stones I first gave the buildings a general base coat of mixed Humbrol matt 121 (a light buff colour) and 29 (brown) leaving random lighter and darker areas and left the model for 48 hours to completely dry.  

Then thinned matt 28 light grey was washed all over the building and wiped off with a cotton cloth to leave mortar lines in the grooves.  This was the main stonework done. With the roof painted with matt 27 grey, and doors, barge boards etc. painted with the livery colours (satin brown & cream) and allowed to dry, work could now begin on the weathering. 

Thinned matt 75 was washed into mortar in some lower areas where damp may appear, and dry brushed matt 80 green used to represent moss. Matt 75 was also dry-brushed on dirty doors etc. where wear and grime would appear.

For the roofs a light grey (No.28) was used dry brushed vertically to show roof staining with a tiny amount of matt 80 green also applied in odd areas and corners. 

I hardly use black(s) at all, and usually represent black with matt 75 Bronze Green and 66 Olive Drab.

Apart from Satin black (85) all these colours (mentioned above) were used on the engine shed.  
The "Humbrol" names are shown below.
110 Natural Wood and 121 Pale Stone mixed for the base stone colours,
29 Dark Earth also for gutter dirt.
28 Camouflage Grey for mortar.
27 Sea Grey for the slates.
75 Bronze Green for mortar loss and damp recesses.
80 Grass Green for moss.
110 Natural Wood and 100 Red Brown mixed for rust.
110 Natural Wood and 121 Pale Stone thinly mixed for brick arch headers.
133 Satin Brown and 71 Satin Oak Cream doors, barge boards, gutters.
66 Olive Drab, oil and grubby marks on doors. 
64 Light Grey for water staining on roof.
33 Matt Black for the main loco door entrance hinges.

I use the same type of paint for locomotives and stock, but using mainly the livery colours, plus 66 Olive Drab to represent dark areas such as under frames.  Goods stock is painted 64 grey, and roofs 27, a darker grey, this is stippled on, and as it dries quite quickly it leaves a slight textured surface.  Weathering: rust, stains and grime are represented too by gently dry brushing, and also using thinned 66 olive drab.   


Sunday, 25 November 2018

Shortwaite Station developments


A view of the upper station "Shortwaite" under construction.

While the hill scenery and cottage gardens are being created, work on Shortwaite Station has been under way.  A platform, retaining walls and fencing has been built, and also a station building.  A new loco acquisition, a Minitrains Krauss 0-4-0 has been purchased - seen as new in the above photo.  I don't know whether or not to Anglicise and repaint this yet, or obtain a new body kit for it.  Also seen is the engine shed with it's base colours applied.

The station building under construction.  It was mainly made with Wills materials sheets: sanded Coarse Stone and roof Slates, with added plasticard details.

The engine shed was made in much the same way as the station building, also with laser cut card window frames.

Doors and barge boards are scratch built with plasticard.  Because of the angle the engine shed is being set, it is cut off  at 45 degrees on the right side of the main roof. 

When this area and it's ground cover is constructed, I must plan the goods yard and upper village scene.  

Monday, 12 November 2018

Houses on the Hill

A couple of cottages have appeared on the hill along with shrubs and trees.

Scenic work continues on "Shortwaite Hill".  Two cottages with walls have been added plus shrubs, trees and flowers applied by my wife around the hill and station area.  The cottages are old Playcraft (and later Hornby) plastic Thatched Cottage kits modified with pan tile roofs, guttering and barge boards.  Here are some posed shots with the Bagnall "Hazel".

Appearing under the bridge carrying the lane over the top.

At "Stonegate" Station.  Lamps and a station name board have also made an appearance.

Running in to "Stonegate" station.  I have a soft spot for the Egger-Bahn "P43" coaches, so I obtained one from the 009 Society sales stand for restoration.  Originally green as below, I repaired two roof corners as they were broken, then re-painted the coach.


Saturday, 27 October 2018

Additions to Shortwaite Hill

A few additions have been made to Shortwaite Hill, made mainly using Wills materials, Model Scene Stone Walls and plasticard.

The goods yard with added buildings. 

A replacement scratch built station shelter for "Stonegate" station before painting, the earlier model will be used for Shortwaite station up on the hill above.

The goods shed too is scratch built, using the roof pieces from a Wills barn.

A goods office from a Ratio Weighbridge hut.

In this picture is a modified and shortened Wills Barn, some new stone walls and scratch built water tower have also been added, while behind, my wife has been adding greenery to the hill scenery.

The station platform area taking shape.

Meanwhile, I have decided, for various reasons, not to go ahead with the tramway layout and want to concentrate on Shortwaite.

Friday, 12 October 2018

The Lie of the Land

Making the hill scenery for Shortwaite Hill

The rock faces, and the retaining walls at the start of the incline, made using Wills Coarse Stone sheets.

The more gradual hill sides were built-up using card strips and covered with layers of p.v.a. coated newspaper.  The steep rock faces used a base of polystyrene blocks glued in place with wood glue.


Here, I have been building up the curved lane - a piece of grey card - with thin plywood, from the over Wills Victorian bridge.

The surface was coated with "Hydrofibre" modelling compound (once marketed as "Soft-Rok" by a firm in Norwich.), it is a two-part mix of fibres and ready-coloured glue mixed with water, and can be applied over the ground former's.  If it is damaged, it can be dampened and smoothed back to shape.  
I highlighted the compound  by dry-brushing with a mixed shade of sandy/grey acrylic paints, then went over it again with sap green, and buff colours. 

These are the completed areas so far.  Cottages will be made beside the lane, and behind them Shortwaite station building.

Down below at the front of the layout will be "Stonegate Station".  Here is the station building and platform under construction, (which was later to appear at "Shortwaite Station rather than "Stonegate"!).  The building is made mainly using sanded Wills Coarse Stone sheets, and the platform is a piece 9mm plywood covered in card.

Sunday, 23 September 2018

DM4 Restoration

A Dundas 4-wheel Coach Restoration 

Completed restoration

The early Dundas 4-wheel coach below once belonged to Norfolk 009 Group co-founder Ray Fothergill.  It is one of the only items I have from his "Fother Valley Railway", after he sadly died in about 2011.


The coach is a DM4 and dates from about 1981 when Dundas had just started,  it has the white metal sole bars and gives the coach a nice bit of weight.
What would we have done without Dundas Models?

So I thought it was about time I did the right thing and re-painted it for use on Shortwaite Hill, which I am sure he would have liked.


I did think about trying to strip the body, but as I've never attempted this before, from plastic anyway,  I took the easy way out and carefully sanded the panels with 500 grit foam-backed paper.

Here is the completed coach before adding weathering.

I added some seats and seated passengers, re-glazed it, and retained the original roof adding new rain strips and gas lamp tops.  I am having a dilemma concerning which couplings to use for the stock, and at the moment it is fitted with "period" Peco GR-101 couplings with a loop only on one end of the vehicle.
For the SHLR livery I played around with brown, cream and tan colours but decided to use Humbrol 133 "brown" and 71 "oak" cream.


Friday, 21 September 2018

Shortwaite Hill Tunnels Mouths etc.

Tunnel Mouths etc.

The tunnel entrance under the upper station.

I have made one or two walls and tunnel mouths for "Shortwaite Hill" this week. 
Built usually with Wills Coarse Stone sheets, I have added capping stones from thick plasticard.  The above tunnel entrance has a girder support, and Ratio Double Rail Stanchions added between the pillars.  The stonework is painted with a mix of Humbrol matt 121 and 29, then after 48 hours drying time, thinned Humbrol 28 is washed over to collect in the mortar joints, and also thinned Humbrol 75 used for the mossy corners and damp mortar and stones, this is all rubbed off the stones with a lightly turps-soaked rag, to leave the mortar lines in the joints.  Dry-brushed matt 80 is also used for more moss effects.

Left-hand tunnel mouth made with sanded Wills Coarse Stone and also uses Peco N gauge wing walls from an NB33 kit.  It is the entrance to the hidden gradient.

 Right-hand tunnel mouth made with sanded Wills Coarse stone and also uses Peco N gauge wing walls from an NB33 kit.  The upper bridge, which spans the line running under the village is a modified NB33 Bridge Side.

This structure is going to be the bottom of the lane which passes cottages.  

A stone wall which borders the railway line on it's scenic ascent.  The track at right angles will be inside a goods shed, accessed by a wagon turntable.


Monday, 10 September 2018

Shortwaite Hill

Shortwaite Hill

(22nd layout)

There comes a time when one has to get things off one's chest.......

The Minitrains Bagnall Wing Tank 0-4-0 (as new), part of the catalyst to try something different.

Plan "S34*" has always appealed to me, and quite recently several others have used the plan as a basis for a 009 scale layout.  Then I saw Mr Tincknell's "Return to the 70's" layout which was based on the same track plan.  For me, it was quite inspirational with the well-modelled buildings in a Northern England setting, much like the Yorkshire Dales.  I never got round to my own project though, fearing that it would be labelled as "un- prototypical", or worse still, called a "rabbit warren", which I don't think it is.

* (S34 - in the PECO 60 Plans for Small Railways booklet)

Then, the Minitrains Bagnall Wing Tank appeared on the market, the perfect little loco to run on it.  But, economy had to be the watch word here.  We haven't all got a bottomless pit of money, so I sold some books and die cast buses that I did not need, and hey-presto the Bagnall has arrived, along with some new irregular sleepered track.

So, why not try to build it, or my version of the S34 track plan?

It's been adapted slightly to what I require, mainly, in that the return loop has gone, and in place of it is a line returning to the lower level so it can be run as a continuous run if required.

"Shortwaite Hill" - bare baseboard and track with point controls being installed.

It's certainly not easy to build.  My version is 44" x 24" (because that's the size of the 6mm plywood I had in the garage that was spare) - it is slightly smaller than the original plan.  It is necessary to decide on a, not too high, measurement for the high level, the higher you make it, the steeper the gradients and the more the locos will struggle.  I chose 50mm as the height, plus the thickness of the 6mm ply-wood.  The gradients have to be gradual and consistent, especially at the top and bottom of the run.  There also has to be enough clearance underneath the high level baseboard at various points, and allowances where the point rods are run.  I thought an important provision was to have access to the hidden tracks for cleaning, and to recover accidents.  Then there is the point control itself, mine is wire-in-tube which brings new problems, especially when you have a long descending gradient behind the back scene, and tubes under the high level base making the clearance less at odd points.

"Shortwaite Hill" will be another North Yorkshire style layout.  It's not an enthusiasts layout, but I'll see where it all goes...
  

Friday, 3 August 2018

New 009 Models/3 Tram No.2

Just recently I have built a new tram for the layout - No.2, which is inspired by the Alford & Sutton Tramway's Black Hawthorn tram locomotive.


I built the loco on a Kato 4 wheeled tram chassis, here is the base plate with one or two added cab details from bits of plasticard and brass tube.  The chimney was later enhanced with a copper cap.


Above is the body under construction using more plasticard.


... and the completed locomotive.  The lamps are from RT Models and the bell is a reproduction Hornby item sold on Ebay.


Here is a photo along with No.1, the Kitson style tram loco built earlier.  The "SNT" stands for the newly named tramway "The Stakesby & Newholm Tramway Co."

Sunday, 22 July 2018

New 009 Models/2: Station building and first goods vehicle


Station Building

Just recently I built a station building using the Ratio Grand Junction L&NWR components:-


I shortened the panels by two planks along the top of the panels and also added a pitched roof using Wills Slates, and a valanced canopy and chimney.  It looks in proportion with the tram loco and coaches already built.

Van


I bought from this goods van from the 009 Society Sales stand.  It is a shortened Bemo 2002 6-wheeled van, and nicely matches the tram too.  I think I am going to buy one or two of the Dundas Irish goods vehicles as they will look in keeping with the stock already built.  

Monday, 9 July 2018

New 009 models/1: 4-wheeled coaches and baseboard

New 009 Models/1

Three passenger coaches to start the rolling stock ball rolling. 
Dundas Models DM28's, and a DM29 with the guards compartment modification.  I have added clerestories to the two single compartment coaches.  Roof's are not yet fixed as I have to add passengers.

Although the weather here has been so hot, I have built a few items to go with the tram.  Three 4w passenger coaches (as photograph above) a station building, and a baseboard. A few goods vehicles are on the list next and hopefully a scratch built tram loco.

Livery for the coaches and the tram engine is Revell 350 satin "Dark Blue", Humbrol 71 satin "Oak" cream, and for the lining Humbrol 132 satin "Red".  I have always brush painted.


The baseboard that has been recently made, in the hope that a model railway will appear on it one day.  In two sections, it is 7ft long by a little under 2ft wide.  


The fiddle yard will be behind the angled back scene board.  In front of this is planned a town street with market, the line running through a town gate into a more country type scene running beside a road.  A station will be at the back of the deeper board with station building, engine shed and goods shed.

Tuesday, 12 June 2018

A Diversion Back

A diversion back

009 Kitson Steam Tram

So what happens when you are suddenly and acutely aware of a lack of space to keep building and storing these large scale models?

An inspirational trip to the Beds & Bucks Narrow Gauge Modellers Open Day at Barton-le-Clay in May started to answer that question.  There were several great 009 layouts exhibited there - wonderful modelling.

Then I found some old Railway Modeller pages with an article that has kept bugging me for many years.  It was H0e scale, it ran steam trams along a town street, then ran out into the country.  I saw a  smaller version of the same layout exhibited at ExpoNG in 2007 - "Pontevedro" by Don Sibley.  A glance at some steam trams running in Britain and Ireland, especially the short-lived Alford & Sutton line, pushed me into building this Kitson (non-condensing) 009 scale steam tram.

During it's build, I seem to spend more time losing, then trying to find small bits of plastic, I don't know whether that's because I had been building larger scale stuff for the past two years, or my even- older age!

The body is a Shapeways 3d print, with scratch built skirt and boiler, running on the inevitable Kato tram chassis plus some added white metal details.  I noticed that the tram "skirt" on this body was far too shallow so I cut it off made my own slightly deeper version.  Also, when I obtained the body I noticed the side window openings didn't have the arched tops, so these were filed too.

  The 3D printed body and the skirt fitting over the chassis.

Mock boiler under construction.

I have bought a few rolling stock kits from Dundas Models to go with the tram.  I will just see how it all goes.

Completed tram without the railway title lettering which I have yet to decide.  It is pictured on a baseboard made from spare ply wood in the form of  the original "Pontevedro" - all pretty hopeful, but we'll see what happens.